PCI CARD INSTALLATION
Step by Step Easy Guide
To Install a, PCI slot, USB or Ethernet Network Card
1. Hardware Installation
Before you begin the board installation, switch off the power to the computer and any peripheral devices and disconnect all power cords.
Important Notes: Before handling the board, ground yourself using a grounding strap attached to the computers metal frame. If you don't have a grounding strap, bring the card, in it's antistatic packaging, to the computer and ground yourself and the card by touching the computer metal case to discharge any static build up on your body and the card wrapping.
Static build up occurs on the body by walking around, so once the card is removed from the packaging refrain from moving away from the computer.
Static charges on your body can damage electronic components. Handle plug-in cards by the edge, do not touch the electronic components or the gold connector contacts.
Make sure you have a philips (cross recess) screw driver handy.
Remove the cover on your computer to access the PCI expansion slots. Refer to your computer documentation if necessary.
Locate an unused PCI slot for installing the card, again refer to your computer documentation if required. All PCI slots are usually identical in capability so the only issue to resolve is the best physical location for the card within the computer case. Think about where you want the rear connector to appear on the back panel when the computer is in it's usual place.
Remove the blanking panel bracket from the rear of the computer case that covers the slot that you intend to use. Keep the bracket. Try not to drop the screw inside the computer when you remove it. Magnetic screwdrivers are sometimes handy for this job but make sure you keep magnets away from your floppy disks!
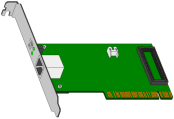
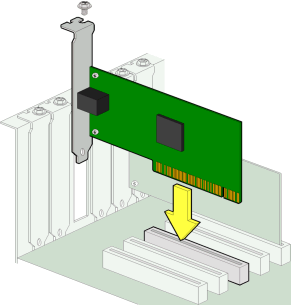
Remove the card from it's antistatic bag and insert the "edge connector" (gold plated contact lines) into the PCI slot, as pictured in Figure 1 below. Make sure the the edge connector is properly aligned with the PCI socket on the motherboard before pressing the card into place. Sometimes the physical tolerance of the computer case is not as good as it should be and card installation can be made more difficult. Apply even pressure to both ends of the card while inserting it.
Figure 1.
Visually check to make sure the card is properly seated and is all the way down in the PCI slot. You should not be able to see much, if any, of the gold plated edge contact lines. If you have difficulty with a particular slot you can always try a different location.
Screw the cards rear bracket down with the screw removed earlier from the blanking panel bracket. Again try not to drop it into the computer. (If you do drop it, make sure you retrieve it BEFORE turning on the computer's power as screws are metalic and could cause electrical damage if left loose in the case).
You may now replace the computer's cover, reconnect the power cords to the computer and peripherals.

